Introduction
On 16/06/2011, Microsoft released the Kinect .NET SDK Beta, right away I had to download it and give it a try, and it's amazing!!!
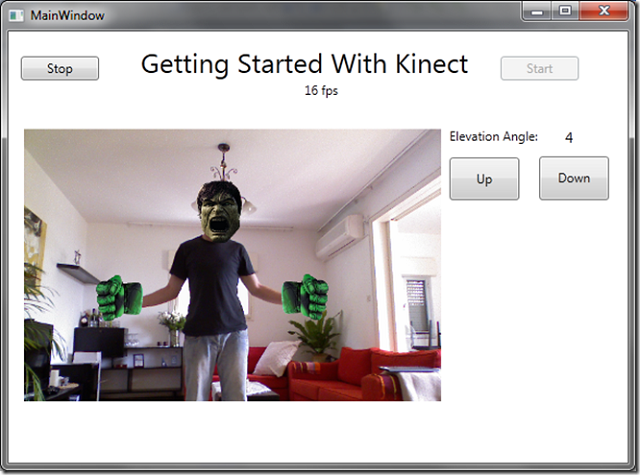
In this article, I'll show you how to Get Started with Kinect SDK, from there we will move forward to how you can control the Camera Angle using the SDK and finally I'll show how to use the Skeleton Tracking and with a nice example of how to become The Incredible Hulk.
Background
The Kinect for Windows SDK beta is a programming toolkit for application developers. It enables the academic and enthusiast communities easy access to the capabilities offered by the Microsoft Kinect device connected to computers running the Windows 7 operating system.
The Kinect for Windows SDK beta includes drivers, rich APIs for raw sensor streams and human motion tracking, installation documents, and resource materials. It provides Kinect capabilities to developers who build applications with C++, C#, or Visual Basic by using Microsoft Visual Studio 2010.
Step 1 - Prepare Your Environment
In order to work with Kinect .NET SDK, you need to have the below requirements:
Supported Operating Systems and Architectures
Hardware Requirements
- Computer with a dual-core, 2.66-GHz or faster processor
- Windows 7-compatible graphics card that supports Microsoft DirectX 9.0c capabilities
- 2 GB of RAM
- Kinect for Xbox 360 sensor-retail edition, which includes special USB/power cabling
Software Requirements
- Microsoft Visual Studio 2010 Express or other Visual Studio 2010 edition
- Microsoft .NET Framework 4.0 (installed with Visual Studio 2010)
- Kinect for Windows SDK Beta download page
Step 2: Create New WPF Project
Add reference to Microsoft.Research.Kinect.Nui (locate under - C:\Program Files (x86)\Microsoft Research KinectSDK) and make sure the solution file for the sample targets the x86 platform, because this Beta SDK includes only x86 libraries.

An application must initialize the Kinect sensor by calling Runtime.Initialize before calling any other methods on the Runtime object. Runtime.Initialize initializes the internal frame-capture engine, which starts a thread that retrieves data from the Kinect sensor and signals the application when a frame is ready. It also initializes the subsystems that collect and process the sensor data. The Initialize method throws InvalidOperationException if it fails to find a Kinect sensor, so the call to Runtime.Initialize appears in a try/catch block.
Create Windows Load Event and call InitializeNui:
private void InitializeNui()

{

	try

	{

		//Declares _kinectNui as a Runtime object,

		//which represents the Kinect sensor instance.

		_kinectNui = new Runtime();


		//Open the video and depth streams, and sets up the event handlers

		//that the runtime calls when a video, depth, or skeleton frame is ready

		//An application must initialize the Kinect sensor by calling

		//Runtime.Initialize before calling any other methods on the Runtime object.

		_kinectNui.Initialize(RuntimeOptions.UseDepthAndPlayerIndex |

						RuntimeOptions.UseSkeletalTracking | RuntimeOptions.UseColor);


		//To stream color images:

		//	 The options must include UseColor.

		//	 Valid image resolutions are Resolution1280x1024 and Resolution640x480.

		//	 Valid image types are Color, ColorYUV, and ColorYUVRaw.

		_kinectNui.VideoStream.Open(ImageStreamType.Video, 2,

								ImageResolution.Resolution640x480, ImageType.ColorYuv);


		//To stream depth and player index data:

		//	 The options must include UseDepthAndPlayerIndex.

		//	 Valid resolutions for depth and player index data are

		//Resolution320x240 and Resolution80x60.

		//	 The only valid image type is DepthAndPlayerIndex.

		_kinectNui.DepthStream.Open(ImageStreamType.Depth, 2,

		ImageResolution.Resolution320x240, ImageType.DepthAndPlayerIndex);


		lastTime = DateTime.Now;


		_kinectNui.VideoFrameReady +=

		new EventHandler(NuiVideoFrameReady);

		_kinectNui.DepthFrameReady +=

		new EventHandler(nui_DepthFrameReady);

	}

	catch (InvalidOperationException ex)

	{

		MessageBox.Show(ex.Message);

	}

}
Step 3: Show Video
Both Video and Depth returns PlanarImage and we just need to create new Bitmap and display on the UI.
Video Frame Ready Event Handler
 void NuiVideoFrameReady(object sender, ImageFrameReadyEventArgs e)

{

	PlanarImage Image = e.ImageFrame.Image;


	image.Source = BitmapSource.Create(

		Image.Width, Image.Height, 96, 96, PixelFormats.Bgr32, null,

		Image.Bits, Image.Width * Image.BytesPerPixel);


	imageCmyk32.Source = BitmapSource.Create(

		Image.Width, Image.Height, 96, 96, PixelFormats.Cmyk32, null,

		Image.Bits, Image.Width * Image.BytesPerPixel);

}
Depth Frame Ready Event Handler
Depth is different because the image you are getting back is 16bit and we need to convert it to 32, I've used the same method like in the SDK.
 void nui_DepthFrameReady(object sender, ImageFrameReadyEventArgs e)

{

	var Image = e.ImageFrame.Image;

	var convertedDepthFrame = convertDepthFrame(Image.Bits);


	depth.Source = BitmapSource.Create(

		Image.Width, Image.Height, 96, 96, PixelFormats.Bgr32,

			null, convertedDepthFrame, Image.Width * 4);


	CalculateFps();

}


// Converts a 16-bit grayscale depth frame which includes player

// indexes into a 32-bit frame

// that displays different players in different colors

byte[] convertDepthFrame(byte[] depthFrame16)

{

	for (int i16 = , i32 = ; i16 < depthFrame16.Length &&

		i32 < depthFrame32.Length; i16 += 2, i32 += 4)

	{

		int player = depthFrame16[i16] & 0x07;

		int realDepth = (depthFrame16[i16 + 1] << 5) | (depthFrame16[i16] >> 3);

		// transform 13-bit depth information into an 8-bit intensity appropriate

		// for display (we disregard information in most significant bit)

		byte intensity = (byte)(255 - (255 * realDepth / 0x0fff));


		depthFrame32[i32 + RED_IDX] = intensity;

		depthFrame32[i32 + BLUE_IDX] = intensity;

		depthFrame32[i32 + GREEN_IDX] = intensity;

	}

	return depthFrame32;

}


void CalculateFps()

{

	++totalFrames;


	var cur = DateTime.Now;

	if (cur.Subtract(lastTime) > TimeSpan.FromSeconds(1))

	{

		int frameDiff = totalFrames - lastFrames;

		lastFrames = totalFrames;

		lastTime = cur;

		frameRate.Text = frameDiff.ToString() + " fps";

	}

}

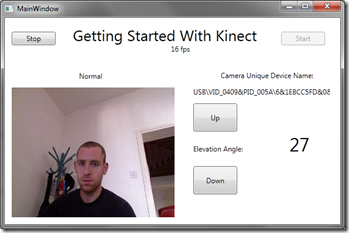
Step 4: Control Camera Angle
Now, I'll show how easy it is to control Kinect Camera Angle (change the position on the camera).
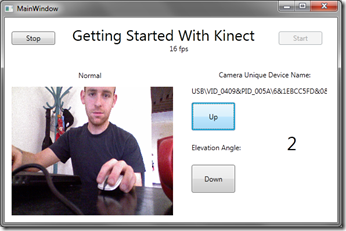
There is Minimum and Maximum angles you can control but as you can see from the last picture (right), you can move the Kinect Sensor manually and the Angle will change automatically.

Create object from the Kinect Nui after the initialization.
private Camera _cam;


_cam = _kinectNui.NuiCamera;

txtCameraName.Text = _cam.UniqueDeviceName;
Here is the Camera definition:
namespace Microsoft.Research.Kinect.Nui

{

	public class Camera

	{

		public static readonly int ElevationMaximum;

		public static readonly int ElevationMinimum;


		public int ElevationAngle { get; set; }

		public string UniqueDeviceName { get; }


		public void GetColorPixelCoordinatesFromDepthPixel

			(ImageResolution colorResolution, ImageViewArea viewArea,

							 int depthX, int depthY, short depthValue, out int colorX,

							 out int colorY);

	}

}
Step 5: Up and Down
Now when you do that, you can control the camera angle as follows:
To increase the Camera Angle, all you need to do is to increase camera ElevationAngle, there are Min and Max angles for the camera that you can control so don't be afraid to push it too much.
private void BtnCameraUpClick(object sender, RoutedEventArgs e)

{

	try

	{

		_cam.ElevationAngle = _cam.ElevationAngle + 5;

	}

	catch (InvalidOperationException ex)

	{

		MessageBox.Show(ex.Message);

	}

	catch (ArgumentOutOfRangeException outOfRangeException)

	{

		//Elevation angle must be between Elevation Minimum/Maximum"

		MessageBox.Show(outOfRangeException.Message);

	}

}
And down:
private void BtnCameraDownClick(object sender, RoutedEventArgs e)

{

	try

	{

		_cam.ElevationAngle = _cam.ElevationAngle - 5;

	}

	catch (InvalidOperationException ex)

	{

		MessageBox.Show(ex.Message);

	}

	catch (ArgumentOutOfRangeException outOfRangeException)

	{

		//Elevation angle must be between Elevation Minimum/Maximum"

		MessageBox.Show(outOfRangeException.Message);

	}

}
Background: Become The Incredible Hulk using Skeleton Tracking
One of the big strengths of Kinect for Windows SDK is its ability to discover the skeleton of joints of a human standing in front of the sensor, very fast recognition system and requires no training to use.
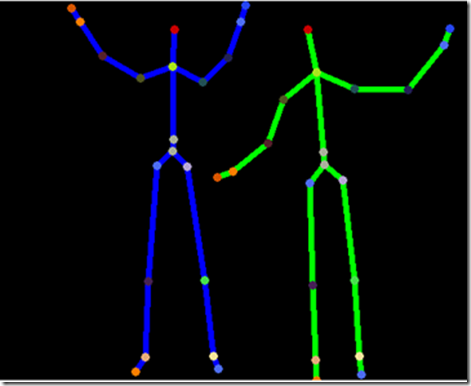
The NUI Skeleton API provides information about the location of up to two players standing in front of the Kinect sensor array, with detailed position and orientation information.
The data is provided to application code as a set of points, called skeleton positions, that compose a skeleton, as shown in the picture below. This skeleton represents a user's current position and pose.
Applications that use skeleton data must indicate this at NUI initialization and must enable skeleton tracking.
The Vitruvian Man has 20 points that are called Joints in Kinect SDK.

Step 6: Register To SkeletonFrameReady
Make sure you Initialize with UseSkeletalTracking, otherwise the Skeleton Tracking will not work.
_kinectNui.Initialize(RuntimeOptions.UseColor |

	RuntimeOptions.UseSkeletalTracking | RuntimeOptions.UseColor);

_kinectNui.SkeletonFrameReady +=

	new EventHandler(SkeletonFrameReady);
The Kinect NUI cannot track more than 2 Skeletons,
if (SkeletonTrackingState.Tracked != data.TrackingState) continue;
means the Skeleton is tracked, untracked Skeletons only gives their position without the Joints, also Skeleton will be rendered if full body fits in frame.
Debugging isn't a simple task when developing for Kinect - Get Up Each time you want to test it.
Skeleton Joints marked by TrackingID enum that defined its reference position:
namespace Microsoft.Research.Kinect.Nui

{

	public enum JointID

	{

		HipCenter,

		Spine,

		ShoulderCenter,

		Head,

		ShoulderLeft,

		ElbowLeft,

		WristLeft,

		HandLeft,

		ShoulderRight,

		ElbowRight,

		WristRight,

		HandRight,

		HipLeft,

		KneeLeft,

		AnkleLeft,

		FootLeft,

		HipRight,

		KneeRight,

		AnkleRight,

		FootRight,

		Count,

	}

}
Step 7: Get Joint Position
The Joint position is defined in Camera Space, and we need to translate to our Size and Position.
Depth Image Space
Image frames of the depth map are 640x480, 320240, or 80x60 pixels in size, with each pixel representing the distance, in millimeters, to the nearest object at that particular x and y coordinate. A pixel value of 0 indicates that the sensor did not find any objects within its range at that location. The x and y coordinates of the image frame do not represent physical units in the room, but rather pixels on the depth imaging sensor. The interpretation of the x and y coordinates depends on specifics of the optics and imaging sensor. For discussion purposes, this projected space is referred to as the depth image space.
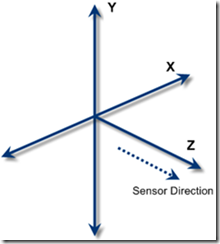
Skeleton Space
Player skeleton positions are expressed in x, y, and z coordinates. Unlike the coordinate of depth image space, these three coordinates are expressed in meters. The x, y, and z axes are the body axes of the depth sensor. This is a right-handed coordinate system that places the sensor array at the origin point with the positive z axis extending in the direction in which the sensor array points. The positive y axis extends upward, and the positive x axis extends to the left (with respect to the sensor array), as shown in Figure 5. For discussion purposes, this expression of coordinates is referred to as the skeleton space.
private Point getDisplayPosition(Joint joint)

{

	float depthX, depthY;

	_kinectNui.SkeletonEngine.SkeletonToDepthImage(joint.Position, out depthX, out depthY);

	depthX = Math.Max(, Math.Min(depthX * 320, 320));  //convert to 320, 240 space

	depthY = Math.Max(, Math.Min(depthY * 240, 240));  //convert to 320, 240 space

	int colorX, colorY;

	ImageViewArea iv = new ImageViewArea();

	// only ImageResolution.Resolution640x480 is supported at this point

	_kinectNui.NuiCamera.GetColorPixelCoordinatesFromDepthPixel

	(ImageResolution.Resolution640x480, iv, (int)depthX, (int)depthY,

	(short), out colorX, out colorY);


	// map back to skeleton.Width & skeleton.Height

	return new Point((int)(imageContainer.Width * colorX / 640.) - 30,

	(int)(imageContainer.Height * colorY / 480) - 30);

}
Step 8: Place Image Based On Joint Type
A position of type Vector4 (x, y, z, w - The first three attributes define the position in camera space. The last attribute (w) gives the quality level (Range between 0-1)) of the position that indicates the center of mass for that skeleton.
This value is the only available positional value for passive players.
void SkeletonFrameReady(object sender, SkeletonFrameReadyEventArgs e)

{

	foreach (SkeletonData data in e.SkeletonFrame.Skeletons)

	{

		//Tracked that defines whether a skeleton is 'tracked' or not.

		//The untracked skeletons only give their position.

		if (SkeletonTrackingState.Tracked != data.TrackingState) continue;


		//Each joint has a Position property that is defined by a Vector4: (x, y, z, w).

		//The first three attributes define the position in camera space.

		//The last attribute (w)

		//gives the quality level (between 0 and 1) of the

		foreach (Joint joint in data.Joints)

		{

			if (joint.Position.W < .6f) return;// Quality check

			switch (joint.ID)

			{

				case JointID.Head:

					var heanp = getDisplayPosition(joint);


					Canvas.SetLeft(imgHead, heanp.X);

					Canvas.SetTop(imgHead, heanp.Y);


					break;

				case JointID.HandRight:

					var rhp = getDisplayPosition(joint);


					Canvas.SetLeft(imgRightHand, rhp.X);

					Canvas.SetTop(imgRightHand, rhp.Y);

					break;

				case JointID.HandLeft:

					var lhp = getDisplayPosition(joint);


					Canvas.SetLeft(imgLefttHand, lhp.X);

					Canvas.SetTop(imgLefttHand, lhp.Y);

					break;

			}

		}

	}

}
Enjoy!
History
This article was originally published on Codeproject.com and reproduced for the benefit of our viewers under the terms of the Ms-PL license.
Software Requirements
- Microsoft Visual Studio 2010 Express or other Visual Studio 2010 edition
- Microsoft .NET Framework 4.0 (installed with Visual Studio 2010)
- Kinect for Windows SDK Beta download page
Step 2: Create New WPF Project
Add reference to Microsoft.Research.Kinect.Nui (locate under - C:\Program Files (x86)\Microsoft Research KinectSDK) and make sure the solution file for the sample targets the x86 platform, because this Beta SDK includes only x86 libraries.
An application must initialize the Kinect sensor by calling Runtime.Initialize before calling any other methods on the Runtime object. Runtime.Initialize initializes the internal frame-capture engine, which starts a thread that retrieves data from the Kinect sensor and signals the application when a frame is ready. It also initializes the subsystems that collect and process the sensor data. The Initialize method throws InvalidOperationException if it fails to find a Kinect sensor, so the call to Runtime.Initialize appears in a try/catch block.
Create Windows Load Event and call InitializeNui:
private void InitializeNui()
{
try
{
//Declares _kinectNui as a Runtime object,
//which represents the Kinect sensor instance.
_kinectNui = new Runtime();
//Open the video and depth streams, and sets up the event handlers
//that the runtime calls when a video, depth, or skeleton frame is ready
//An application must initialize the Kinect sensor by calling
//Runtime.Initialize before calling any other methods on the Runtime object.
_kinectNui.Initialize(RuntimeOptions.UseDepthAndPlayerIndex |
RuntimeOptions.UseSkeletalTracking | RuntimeOptions.UseColor);
//To stream color images:
// The options must include UseColor.
// Valid image resolutions are Resolution1280x1024 and Resolution640x480.
// Valid image types are Color, ColorYUV, and ColorYUVRaw.
_kinectNui.VideoStream.Open(ImageStreamType.Video, 2,
ImageResolution.Resolution640x480, ImageType.ColorYuv);
//To stream depth and player index data:
// The options must include UseDepthAndPlayerIndex.
// Valid resolutions for depth and player index data are
//Resolution320x240 and Resolution80x60.
// The only valid image type is DepthAndPlayerIndex.
_kinectNui.DepthStream.Open(ImageStreamType.Depth, 2,
ImageResolution.Resolution320x240, ImageType.DepthAndPlayerIndex);
lastTime = DateTime.Now;
_kinectNui.VideoFrameReady +=
new EventHandler(NuiVideoFrameReady);
_kinectNui.DepthFrameReady +=
new EventHandler(nui_DepthFrameReady);
}
catch (InvalidOperationException ex)
{
MessageBox.Show(ex.Message);
}
}
Step 3: Show Video
Both Video and Depth returns PlanarImage and we just need to create new Bitmap and display on the UI.
Video Frame Ready Event Handler
void NuiVideoFrameReady(object sender, ImageFrameReadyEventArgs e)
{
PlanarImage Image = e.ImageFrame.Image;
image.Source = BitmapSource.Create(
Image.Width, Image.Height, 96, 96, PixelFormats.Bgr32, null,
Image.Bits, Image.Width * Image.BytesPerPixel);
imageCmyk32.Source = BitmapSource.Create(
Image.Width, Image.Height, 96, 96, PixelFormats.Cmyk32, null,
Image.Bits, Image.Width * Image.BytesPerPixel);
}
Depth Frame Ready Event Handler
Depth is different because the image you are getting back is 16bit and we need to convert it to 32, I've used the same method like in the SDK.
void nui_DepthFrameReady(object sender, ImageFrameReadyEventArgs e)
{
var Image = e.ImageFrame.Image;
var convertedDepthFrame = convertDepthFrame(Image.Bits);
depth.Source = BitmapSource.Create(
Image.Width, Image.Height, 96, 96, PixelFormats.Bgr32,
null, convertedDepthFrame, Image.Width * 4);
CalculateFps();
}
// Converts a 16-bit grayscale depth frame which includes player
// indexes into a 32-bit frame
// that displays different players in different colors
byte[] convertDepthFrame(byte[] depthFrame16)
{
for (int i16 = , i32 = ; i16 < depthFrame16.Length &&
i32 < depthFrame32.Length; i16 += 2, i32 += 4)
{
int player = depthFrame16[i16] & 0x07;
int realDepth = (depthFrame16[i16 + 1] << 5) | (depthFrame16[i16] >> 3);
// transform 13-bit depth information into an 8-bit intensity appropriate
// for display (we disregard information in most significant bit)
byte intensity = (byte)(255 - (255 * realDepth / 0x0fff));
depthFrame32[i32 + RED_IDX] = intensity;
depthFrame32[i32 + BLUE_IDX] = intensity;
depthFrame32[i32 + GREEN_IDX] = intensity;
}
return depthFrame32;
}
void CalculateFps()
{
++totalFrames;
var cur = DateTime.Now;
if (cur.Subtract(lastTime) > TimeSpan.FromSeconds(1))
{
int frameDiff = totalFrames - lastFrames;
lastFrames = totalFrames;
lastTime = cur;
frameRate.Text = frameDiff.ToString() + " fps";
}
}
Step 4: Control Camera Angle
Now, I'll show how easy it is to control Kinect Camera Angle (change the position on the camera).
There is Minimum and Maximum angles you can control but as you can see from the last picture (right), you can move the Kinect Sensor manually and the Angle will change automatically.
Create object from the Kinect Nui after the initialization.
private Camera _cam;
_cam = _kinectNui.NuiCamera;
txtCameraName.Text = _cam.UniqueDeviceName;
Here is the Camera definition:
namespace Microsoft.Research.Kinect.Nui
{
public class Camera
{
public static readonly int ElevationMaximum;
public static readonly int ElevationMinimum;
public int ElevationAngle { get; set; }
public string UniqueDeviceName { get; }
public void GetColorPixelCoordinatesFromDepthPixel
(ImageResolution colorResolution, ImageViewArea viewArea,
int depthX, int depthY, short depthValue, out int colorX,
out int colorY);
}
}
Step 5: Up and Down
Now when you do that, you can control the camera angle as follows:
To increase the Camera Angle, all you need to do is to increase camera ElevationAngle, there are Min and Max angles for the camera that you can control so don't be afraid to push it too much.
private void BtnCameraUpClick(object sender, RoutedEventArgs e)
{
try
{
_cam.ElevationAngle = _cam.ElevationAngle + 5;
}
catch (InvalidOperationException ex)
{
MessageBox.Show(ex.Message);
}
catch (ArgumentOutOfRangeException outOfRangeException)
{
//Elevation angle must be between Elevation Minimum/Maximum"
MessageBox.Show(outOfRangeException.Message);
}
}
And down:
private void BtnCameraDownClick(object sender, RoutedEventArgs e)
{
try
{
_cam.ElevationAngle = _cam.ElevationAngle - 5;
}
catch (InvalidOperationException ex)
{
MessageBox.Show(ex.Message);
}
catch (ArgumentOutOfRangeException outOfRangeException)
{
//Elevation angle must be between Elevation Minimum/Maximum"
MessageBox.Show(outOfRangeException.Message);
}
}
Background: Become The Incredible Hulk using Skeleton Tracking
One of the big strengths of Kinect for Windows SDK is its ability to discover the skeleton of joints of a human standing in front of the sensor, very fast recognition system and requires no training to use.
The NUI Skeleton API provides information about the location of up to two players standing in front of the Kinect sensor array, with detailed position and orientation information.
The data is provided to application code as a set of points, called skeleton positions, that compose a skeleton, as shown in the picture below. This skeleton represents a user's current position and pose.
Applications that use skeleton data must indicate this at NUI initialization and must enable skeleton tracking.
The Vitruvian Man has 20 points that are called Joints in Kinect SDK.
Step 6: Register To SkeletonFrameReady
Make sure you Initialize with UseSkeletalTracking, otherwise the Skeleton Tracking will not work.
_kinectNui.Initialize(RuntimeOptions.UseColor |
RuntimeOptions.UseSkeletalTracking | RuntimeOptions.UseColor);
_kinectNui.SkeletonFrameReady +=
new EventHandler(SkeletonFrameReady);
The Kinect NUI cannot track more than 2 Skeletons,
if (SkeletonTrackingState.Tracked != data.TrackingState) continue;
means the Skeleton is tracked, untracked Skeletons only gives their position without the Joints, also Skeleton will be rendered if full body fits in frame.
Debugging isn't a simple task when developing for Kinect - Get Up Each time you want to test it.
Skeleton Joints marked by TrackingID enum that defined its reference position:
namespace Microsoft.Research.Kinect.Nui
{
public enum JointID
{
HipCenter,
Spine,
ShoulderCenter,
Head,
ShoulderLeft,
ElbowLeft,
WristLeft,
HandLeft,
ShoulderRight,
ElbowRight,
WristRight,
HandRight,
HipLeft,
KneeLeft,
AnkleLeft,
FootLeft,
HipRight,
KneeRight,
AnkleRight,
FootRight,
Count,
}
}
Step 7: Get Joint Position
The Joint position is defined in Camera Space, and we need to translate to our Size and Position.
Depth Image Space
Image frames of the depth map are 640x480, 320240, or 80x60 pixels in size, with each pixel representing the distance, in millimeters, to the nearest object at that particular x and y coordinate. A pixel value of 0 indicates that the sensor did not find any objects within its range at that location. The x and y coordinates of the image frame do not represent physical units in the room, but rather pixels on the depth imaging sensor. The interpretation of the x and y coordinates depends on specifics of the optics and imaging sensor. For discussion purposes, this projected space is referred to as the depth image space.
Skeleton Space
Player skeleton positions are expressed in x, y, and z coordinates. Unlike the coordinate of depth image space, these three coordinates are expressed in meters. The x, y, and z axes are the body axes of the depth sensor. This is a right-handed coordinate system that places the sensor array at the origin point with the positive z axis extending in the direction in which the sensor array points. The positive y axis extends upward, and the positive x axis extends to the left (with respect to the sensor array), as shown in Figure 5. For discussion purposes, this expression of coordinates is referred to as the skeleton space.
private Point getDisplayPosition(Joint joint)
{
float depthX, depthY;
_kinectNui.SkeletonEngine.SkeletonToDepthImage(joint.Position, out depthX, out depthY);
depthX = Math.Max(, Math.Min(depthX * 320, 320)); //convert to 320, 240 space
depthY = Math.Max(, Math.Min(depthY * 240, 240)); //convert to 320, 240 space
int colorX, colorY;
ImageViewArea iv = new ImageViewArea();
// only ImageResolution.Resolution640x480 is supported at this point
_kinectNui.NuiCamera.GetColorPixelCoordinatesFromDepthPixel
(ImageResolution.Resolution640x480, iv, (int)depthX, (int)depthY,
(short), out colorX, out colorY);
// map back to skeleton.Width & skeleton.Height
return new Point((int)(imageContainer.Width * colorX / 640.) - 30,
(int)(imageContainer.Height * colorY / 480) - 30);
}
Step 8: Place Image Based On Joint Type
A position of type Vector4 (x, y, z, w - The first three attributes define the position in camera space. The last attribute (w) gives the quality level (Range between 0-1)) of the position that indicates the center of mass for that skeleton.
This value is the only available positional value for passive players.
void SkeletonFrameReady(object sender, SkeletonFrameReadyEventArgs e)
{
foreach (SkeletonData data in e.SkeletonFrame.Skeletons)
{
//Tracked that defines whether a skeleton is 'tracked' or not.
//The untracked skeletons only give their position.
if (SkeletonTrackingState.Tracked != data.TrackingState) continue;
//Each joint has a Position property that is defined by a Vector4: (x, y, z, w).
//The first three attributes define the position in camera space.
//The last attribute (w)
//gives the quality level (between 0 and 1) of the
foreach (Joint joint in data.Joints)
{
if (joint.Position.W < .6f) return;// Quality check
switch (joint.ID)
{
case JointID.Head:
var heanp = getDisplayPosition(joint);
Canvas.SetLeft(imgHead, heanp.X);
Canvas.SetTop(imgHead, heanp.Y);
break;
case JointID.HandRight:
var rhp = getDisplayPosition(joint);
Canvas.SetLeft(imgRightHand, rhp.X);
Canvas.SetTop(imgRightHand, rhp.Y);
break;
case JointID.HandLeft:
var lhp = getDisplayPosition(joint);
Canvas.SetLeft(imgLefttHand, lhp.X);
Canvas.SetTop(imgLefttHand, lhp.Y);
break;
}
}
}
}
Enjoy!
History
This article was originally published on Codeproject.com and reproduced for the benefit of our viewers under the terms of the Ms-PL license.


 ).
).