This time around I've decided to try something different (and thanks @isu diss for suggestion), which is - volumetric light scattering. To make this a bit more challenging for me, I've decided to implement this completely in Unity, all the code snippets will be mostly in pseudo code. Alright, let's start!
Introduction
When we talk about volumetric light scattering - we often talk about simulating lights and shadows in fog or haze. Generally speaking, simulating light scattering in participating media. Before we go into basic math - we have to define some important properties of participating media we want to simulate (for the sake of computation efficiency):
- Homogeneity
- No light emission properties
Light Scattering
As we want to render this volume, we have to calculate how radiance reaching the camera changes when viewing light through the volume. To compute this a ray marching technique will be utilized, to accumulate radiance along the view ray from the camera. What we have to solve is a radiative transport equation:

Where:
- Left side represents change in radiance along ray
- represents density (probability of collision in unit distance)
- albedo that equals probability of scattering (i.e. not absorbing) after collision
- represents phase function, probability density function of the scattering direction
Note: similarity of this equation to "The Rendering Equation" is not random!
This is actually Fredholm's 2nd kind integral equation - which are resulting in nested integrals. These equations are mostly solved using Monte Carlo methods, and one of the ways how to solve this one is using Monte Carlo Path Tracing. Although as I aim to use this effect in real time on average hardware, such approach is not possible and optimization is required. As per Real Time Volumetric Lighting in Participating Media by Balazs Toth and Tamas Umenhoffer (available from http://sirkan.iit.bme.hu/~szirmay/lightshaft.pdf), we will further ignore multiple scattering and using single in-scattering term like:

And therefore:

Which can be integrated into:

And therefore:

This equation actually describes whole technique, or to be precise - the last term in equation (the sum) defines the actual radiance that was received from given point.The computation is quite straight forward:
- For ray (per-pixel) we determine position where we enter participating media
- From this on, we are going to make small steps through participating media, these are our sample points
- For each of this sample points, we compute in-scattering term , absorption factor and add into radiance that is going to be returned
The last thing is in-scattering function, which has to be calculated for each light type separately. Which can be calculated by solving this:
In short - it will always contain density

and albedo

, phase function, absorption factor

, visibility function (returns 0 for point in shadow/invisible, 1 otherwise)

and radiance energy received from the light over the whole hemisphere - for point light this will be

where:
- represents power of the light
- represents distance between sample point and light
Which wraps up the math-heavy part of the article, and let's continue with Ray Marching description as it is required for understanding of this technique.
Ray Marching
Is a technique where given a ray origin and direction we pass through the volume not analytically, but using small steps. At each step, some function is computed often contributing to resulting color. In some cases we can early-exit upon satisfying some conditions.
Ray marching is often performed within some specific boundaries - often an axis-aligned box, which I'm going to use in the example ray marching implementation. For the sake of simplicity let's assume our axis-aligned bounding box is at position _Position with size of _Scale. To perform ray marching we have to find entry point of the ray, and perform up to N steps through it until we exit out of the box.
Before going further - I assume everyone has knowledge of what world, view, etc. coordinates are. To this set let's add one coordinate system and that is volume coordinates. These coordinates are from 0.0 - 1.0 for 3 axes determining where we are inside the volume (actually just like 3D texture coordinates).
Let's have a following function determining whether given position is inside of the sphere or not:
// Are we inside of unit sphere bound to volume coordinates
// position - given position on which we decide whether we're inside or
//            outside, in volume coordinates
bool sphere(float3 position)
{
	// Transform volume coordinates from [0 to 1] to [-1 to 1] and use sphere
	// equation (r^2=x^2+y^2+z^2) to determine whether we're inside or outside
	if (length(position * 2.0f - 1.0f) < 1.0f)
	{
		// Inside
		return true;
	}
	else
	{
		// Outside
		return false;
	}
}
Now, with ray marching technique we should be able to render a sphere in this volume. Simply by starting at the edge of specified volume, marching through and at each step determining whether we're inside or outside of the sphere. Whenever we're inside, we can return and render white color, otherwise continue (if we miss everything, render black color):
// Origin of our ray
float3 rayOrigin = i.worldPos.xyz;

// Origin in volume coordinates
float3 rayCoord = (rayOrigin - _Position.xyz) / _Scale.xyz + 0.5f;

// Direction along which ray will march through volume
float3 rayDirection = normalize(i.worldPos.xyz - _WorldSpaceCameraPos.xyz);

// Single step, the longest ray that is possible in volume is diagonal,
// therefore we perform steps at size of diagonal length / N, where N
// represents maximum number of steps possible during ray marching
float rayStep = sqrt(_Scale.x * _Scale.x + _Scale.y * _Scale.y + _Scale.z * _Scale.z) / (float)_Samples;

// Did we hit a sphere?
bool hit = false;

// Perform ray marching [loop]
for (int i = 0; i < _Samples; i++)
{
	// Determine whether we hit sphere or not
	hit = sphere(rayCoord);

	// If so, we can exit computation
	if (hit) { break; }

	// Move ray origin forward along direction by step size
	rayOrigin += rayDirection * rayStep;

	// Update volume coordinates
	rayCoord = (rayOrigin - _Position.xyz) / _Scale.xyz + 0.5f;

	// If we are out of the volume we can also exit
	if (rayCoord.x < 0.0f || rayCoord.x > 1.0f || rayCoord.y < 0.0f || rayCoord.y > 1.0f || rayCoord.z < 0.0f || rayCoord.z > 1.0f) { break; }
}

// Did we hit?
float color = hit ? 1.0f : 0.0f;

// Color output
return float4(color, color, color, 1.0f);
Which will yield us this-like result:
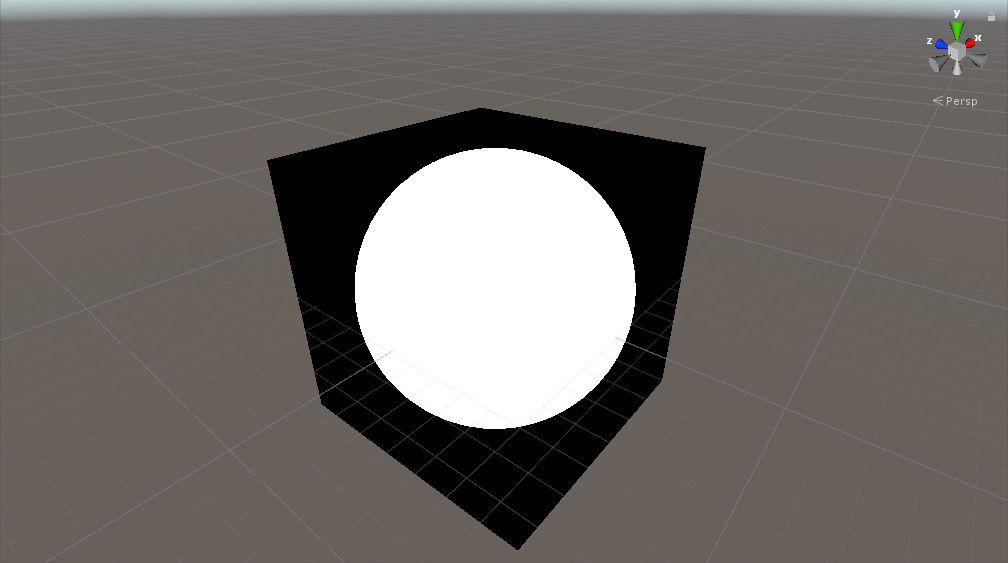
Fig. 01 - Rendered sphere using ray marching technique
Now if we would look at how many steps we have performed to render this (per pixel):
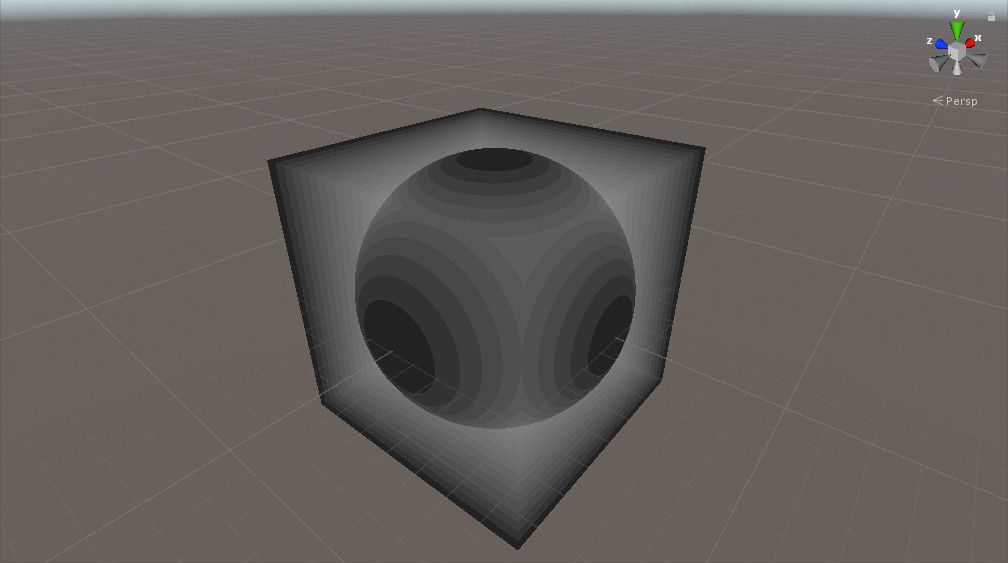
Fig. 02 - Number of steps performed before hitting sphere or exiting out of the volume
While this is one of the less efficient ways to render a sphere, ray marching allows us to actually process through volume at small steps accumulating values over time, therefore it is highly efficient method of rendering volumetric effects like fire, smoke, etc.
Light Scattering Implementation
Let's jump ahead into light scattering implementation. Based on the theory this will be quite straight forward - there is just one catch, as we are specifying the volume with axis-aligned bounding box, it is crucial to note that we need actually 2 different computations for both situations - one where camera is outside and one where camera is inside. Let's start with the one where camera is inside.
// Screen space coordinates allowing for fullscreen projection of camera
// z-buffer
float2 projCoord = i.projection.xy / i.projection.w;
projCoord *= 0.5f;
projCoord += 0.5f;
projCoord.y = 1.0f - projCoord.y;

// Read z-value from camera depth texture, and linearize it to 0.0 - 1.0
float zvalue = LinearizeDepth(tex2D(ViewDepthTexture, projCoord).x);

// Origin of our ray
float3 rayOrigin = WorldSpaceCameraPosition.xyz;

// Origin in volume coordinates
float3 rayCoord = (rayOrigin - _Position.xyz) / _Scale.xyz + 0.5f;

// Direction along which ray will march through volume
float3 rayDirection = normalize(i.worldPos.xyz - WorldSpaceCameraPosition.xyz);

// Push camera origin to near camera plane
rayOrigin += rayDirection * CameraNearPlane;

// Single step, the longest ray that is possible in volume is diagonal,
// therefore we perform steps at size of diagonal length / N, where N
// represents maximum number of steps possible during ray marching
float rayStep = sqrt(_Scale.x * _Scale.x + _Scale.y * _Scale.y + _Scale.z * _Scale.z) / (float)_Samples;

// Steps counter
int steps = 0;

// Resulting value of light scattering
float3 L = float3(0.0f, 0.0f, 0.0f);

// Perform ray marching [loop]
for (int i = 0; i < _Samples; i++)
{
	// Move ray origin forward along direction by step size
	rayOrigin += rayDirection * rayStep;

	// Update volume coordinates
	rayCoord = (rayOrigin - _Position.xyz) / _Scale.xyz + 0.5f;

	// Calculate linear z value for current position during the ray marching
	float z = -(mul(ViewMatrix, float4(rayOrigin, 1.0f)).z) / (CameraFarPlane - CameraNearPlane);

	// In case we are behind an object, terminate ray marching
	if (z >= zvalue) { break; }

	// Light scattering computation
	// Sample visibility for current position in ray marching, we use standard
	// shadow mapping to obtain whether current position is in shadow, in that
	// case returns 0.0, otherwise 1.0
	float v = SampleShadow(rayOrigin, mul(ViewMatrix, float4(rayOrigin, 1.0f)));

	// Calculate distance from light for in-scattering component of light
	float d = length(LightPosition.xyz - rayOrigin.xyz);

	// Radiance reaching the sample position
	// Depends on volume scattering parameters, light intensity, visibility and
	// attenuation function
	float L_in = exp(-d * _TauScattering) * v * LightIntensity / (4.0f * 3.141592f * d * d);

	// In-scattering term for given sample
	// Applies albedo and phase function
	float3 L_i = L_in * _TauScattering * _Albedo.xyz * Phase(normalize(rayOrigin - WorldSpaceLightPosition), normalize(rayOrigin - WorldSpaceCameraPosition));

	// Multiply by factors and sum into result
	L += L_i * exp(-length(rayOrigin - WorldSpaceCameraPosition) * _TauScattering) * rayStep;
	steps++;

	// If we are out of the volume we can also exit
	if (rayCoord.x < 0.0f || rayCoord.x > 1.0f || rayCoord.y < 0.0f || rayCoord.y > 1.0f || rayCoord.z < 0.0f || rayCoord.z > 1.0f) { break; }
}

// Output light scattering
return float4(L, 1.0f);
Which will compute light scattering inside the volume. Resulting in this like image:
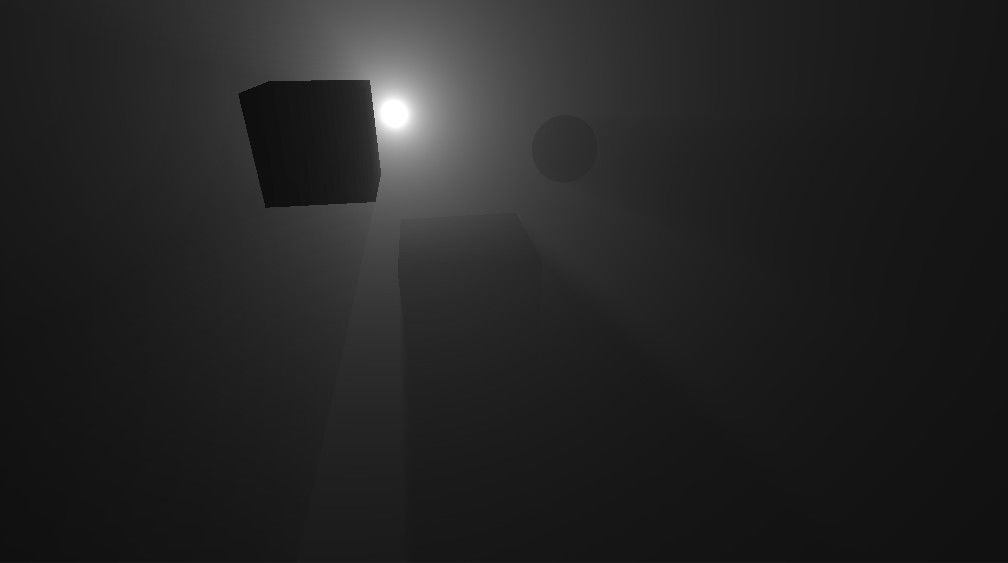
Fig. 03 - Light scattering inside volume with shadowed objects
For the computation from outside of the volume one has to start with origin not being camera, but actual points where we enter the volume. Which isn't anything different than:
// Origin of our ray
float3 rayOrigin = i.worldPos.xyz;
Of course, further when computing total radiance transferred from the step to the camera, the distance passed into exponent has to be only distance that has been traveled inside of the volume, e.g.:
// Multiply by factors and sum into result
L += L_i * exp(-length(rayOrigin - rayEntry) * _TauScattering) * rayStep;
Where ray entry is input world position in the shader program. To have good image quality, post processing effects (like tone mapping) are required, resulting image can look like:
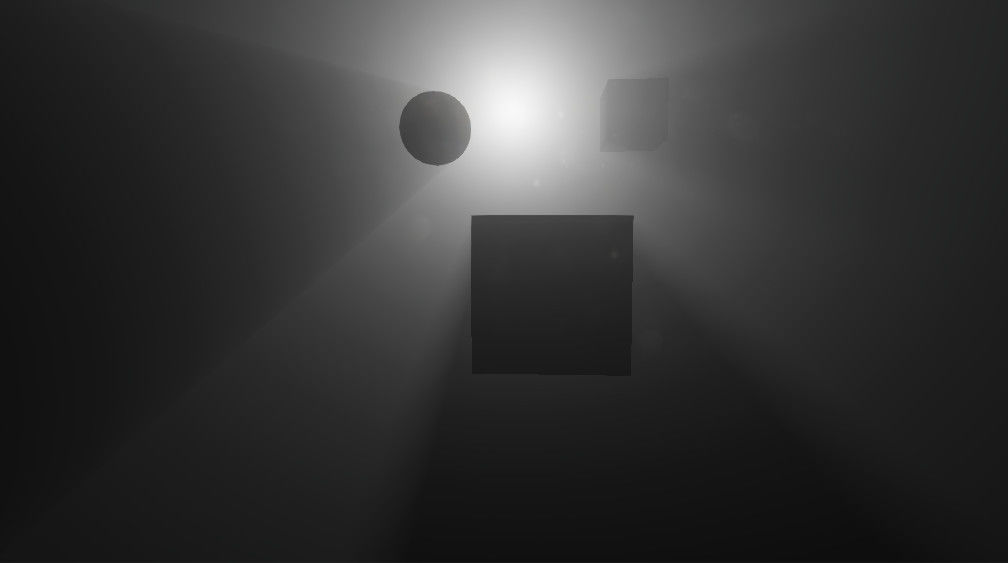
Fig. 04 - Image with post processing effects.
What wasn't described from the algorithm is the Phase function. The phase function determines probability density of scattering incoming photons into outgoing directions. One of the most common is Rayleigh phase function (which is commonly used for atmospheric scattering):
float Phase(float3 inDir, float3 outDir)
{
	float cosAngle = dot(inDir, outDir) / (length(inDir) * length(outDir));
	float nom = 3.0f * (1.0f + cosAngle * cosAngle);
	float denom = 16.0f * 3.141592f;
	return nom / denom;
}
Other common phase functions are Henyey-Greenstein or Mie.
On Optimization
There could be a huge chapter on optimization of light scattering effects. To obtain images like above, one needs to calculate large amount of samples, which requires a lot of performance. Reducing them ends up in slicing which isn't visually pleasant.
In the next figure, a low number of samples is being used:
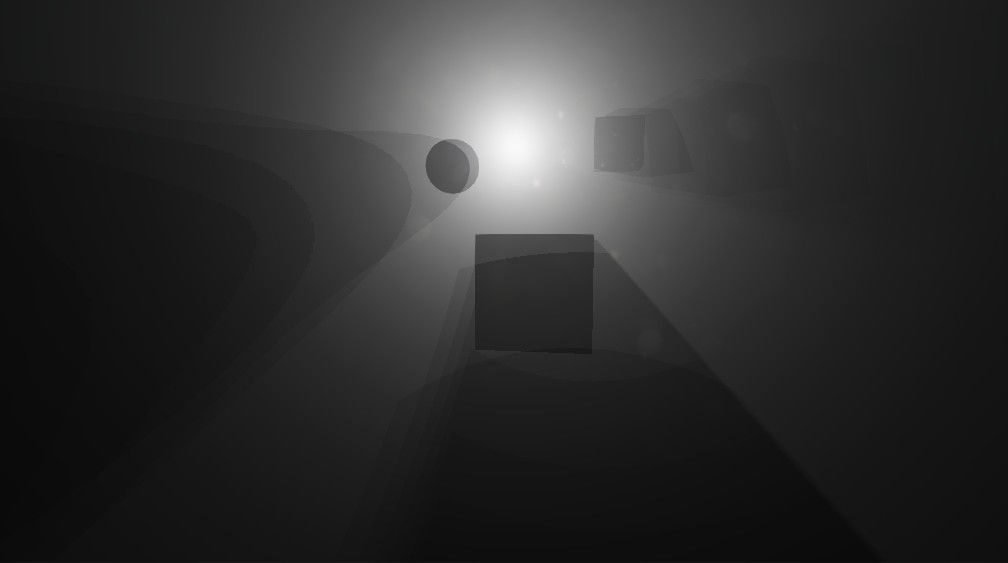
Fig. 05 - Low number of samples for ray marching.
By simple modification, adding a random small offset to each step size - a noise will be introduced, and stepping artifacts will be removed, like:

Fig. 06 - With low amount of samples and randomization, the image quality can be improved.
Further, the shader programs provided in previous section were reference ones. They can be optimized a bit, reducing number of computations within the ray marching loop. Such as not working with ray origin, but only with ray coordinates within the loop.
Also, rendering light scattering effects is often done at half or quarter resolution, or using interleaved sampling (For example, dividing whole image into block of 2x2 pixels, and calculating 1 of them each frame - thus reducing required computation power). The actual difference is then hardly visible when user moves around due to other effects like motion blur.
All optimization tricks are left for a reader to try and implement.
Extensions
I intentionally pushed for implementing this algorithm inside the specified volume. While doing it as a full screen pass seems more straight forward, it actually is somehow limited.
Using a specific volume can bring us further to simulating clouds or smoke, and lighting it correctly with this algorithm. Of course that would require a voxel texture representing density and albedo at each voxel in the volume. Applying a noise as density could result in interesting effects like ground fog, which may be especially interesting in various caves, or even outside.
Results
Instead of talking about the results, I will go ahead and share both - picture and a video:
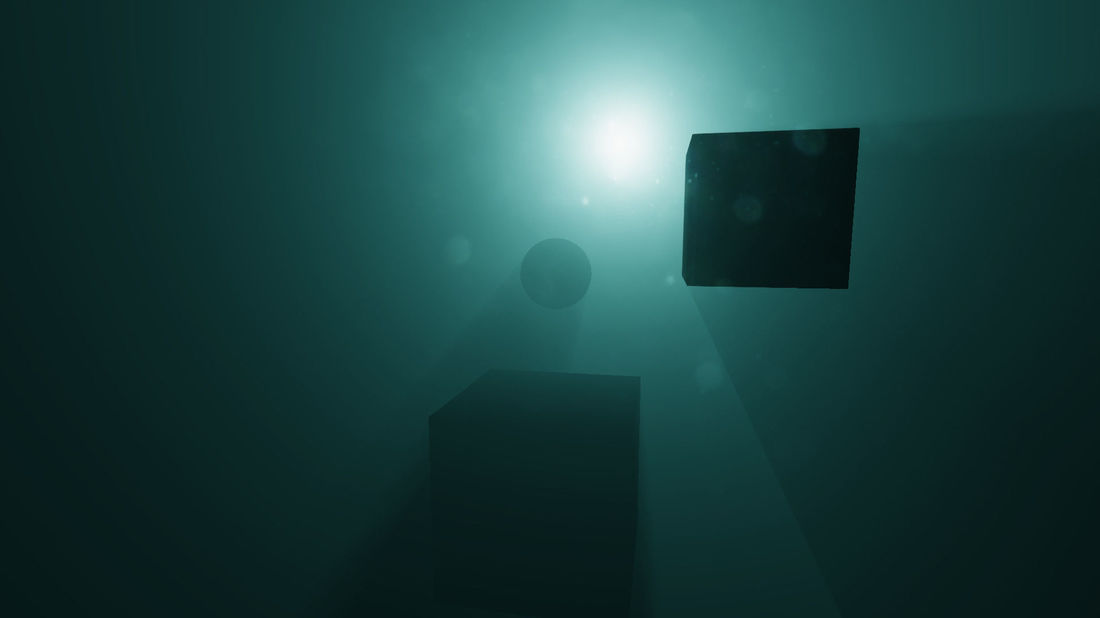
Fig. 07 - Picture showing the resulting light scattering
Fig. 08 - Video showing the end result.
The video shows really basic usage - it is rendered using the code explained earlier, only with albedo color for the fog.
Conclusion
This is by far one of the longest article I've ever written - I actually didn't expect the blog post being this long, and I can imagine some people here can be a bit scared by its size. Light scattering isn't easy, and even at this length of the article - it describes just basics. I hope you have enjoyed 'Effect' post this time, if I did any mistake in equations or source code - please let me know, I'll gladly update it.
I'm also considering wrapping an improved version of this as unity package and making it available on Asset Store at some point (although there are numerous similar products available there). Anyways please let me know what you think!


I noticed that in the video I accidentally also captured Screen2Gif UI - as it doesn't impact the resulting video I will not be re-capturing it.
Also note that this was actually my 1st time using Screen2Gif to capture HD video in 1080 format - I'm quite happy it worked well together with YouTube.